Starlight Art Glass Studio

METAL ~ GLASS ~ WOOD

CREATIONS
WWWEe
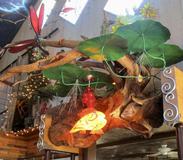
Changing with the times.  This is what we have been doing since September 25, 2012. Click on picture to make larger and for comments.  commentshruCwe have been doing 
This is the barn that housed the shop (since 1988) and art studio (since 2001).
Digging for waterline and electric to disconnect. 9/25/12
Excavator clawing down the shop.
The art studio was next to be destroyed.
Entire building laying on ground in 25 minutes.  Makes one wonder how stable structure really was.
Silo next in line to be dropped. 9/26/12
There she goes just like a tree falling in the timber. It does make noise!
Clean up begins. Completed the last week of September.
Equipment working hard cleaning up.
27 holes dug for 27 post to go into ground.
175 tons of gravel to level site. Compacted in 4 inch lifts using a compactor.
Building site ready for concrete. One ton of rebar installed.
7:30 am first load of concrete arrives, backing up to pumper truck.
Excellent help from the Kershner brothers and friends to get this huge job done the first part of November.
Poured 36 yards of concrete in two hours. Leveled and floated!
Stamping on concrete completed by 3:00 pm. Added rope around the pour to keep deer out.
Framing started.
Night time view of the structure.
Skytrack used to set trusses. December 2012
Skytract used to set steel columns.
Building with rid beam in center to carry I Joist for cathedral ceiling.
Welding beam to carry mezzanine  floor.
Setting first I Joist on December 27th, 2012.
All I joist set in 3 hours.  Keep in mind the majority of this project is being done with 2 - 3  part-time people. December 27,2012
January 1, 2013... working on the building!
Placing the roof sheets down on the north side of the gallery. 1/8/13
Finished putting the roof sheets down on the north side. 1/8/13
View down the greenhouse similar to the 1st picture in this series, to give you a look at how it has changed.
Started on the south side with the roof sheets. 1/8/13
Completed shingling center of building 1/15/13.
Weather holding - center roof done.
Starting with the southeast roof. 1/17/13!
 Gray metal sheets used for roof. Southeast side - done.
North side roof - done!
Finished the roof 1/26/13!  THANK YOU to Bro Les, Bro Wayne, Hubby Chuck - you guys are amazing. Building is looking awesome.
First sheet up of metal siding up. It is amazing how much work there is before the siding can be put on the building. J trim,  windows in and trimmed out with drip trim on top, etc. 2/8/13
Metal siding up on south side of building 2/8/13.
Starting the north side of building with metal siding. 2/9/13
Completed metal siding on north side of building. 2/9/13
East exterior wall completed with window, siding and door.
2/16/13
Great week, siding and installed door on the east side of building. 2/16/13
Plywood on the center of the building. Ready to cut out for the windows and to install them. 2/28/13
Starting on the interior. 3/2/13
 Interior I joist in place and lower plate placed on concrete for the studded wall.  Great Day!  Thank You  Chuck K and Les K!  3/2/13
Yeah - we have interior walls up! 3/5/13
Starting to take shape inside. View when you enter the main building. 3/5/13
The section of the building that will house the aquariums and water garden/nursery supplies, cleaned out and ready to start putting up walls. 3/11/13
Steps installed that go to the loft. 3/10/13
Side view of steps and framing of  interior wall.
View entering the main building. Loft subfloor down, steps and interior wall framing. 3/11/13
Front of building using the old barn doors that where in the old barn!  One window cut out and plastic over it because of the nasty weather.
Starting of remove the plywood for the windows.
Finished cutting out windows in the center section
Center of building wrapped in house wrap for protection. Windows installed!!! 3/16/13
Let there be light.  Windows installed, washed inside and out. 3/16/13
What a great week... all the exterior main wall siding finished. 4 of the 6 diamond window frames are in place then this area of the building will be ready for siding.  4/5/13
East side of upper center building siding completed around the diamond shaped windows.4/11/13
We are being watched, 5 orbes in this pic.
OMG the mess we can make in one day with a Mini Ex.  Running utilities. 4/13/13  The white material on the center on the building will be something exciting. You will have to wait and see what we create!
Mastic and ridge cap completed on the east 1/3 of the building. It is now water tight so we can start on the interior. 4/21/13
Window installed on east side of Gallery area. East section of building water tight, mastic and ridge cap done. 4/20/13 Ready to start on the inside now.
Last piece of metal siding went up today on west side of Gallery!!!!  YEAH   4/26/13 Finished placing the glass in the west diamond windows, mastic the roof sheets and ridge cap on the west section of the building.  Water tight 4/29/13!
Sunday Morning 5/26/13
Metal ceiling up in the Pond Shop - electrical ran, drywall up and first coat of mud on the drywall. 5/26/13
Using Leaves for the pattern on the ceiling.
Painting the leaf pattern on the ceiling to add interest. 5/26/13
Using 3 different colors to get the shading.
Monday evening finished ceiling and second coat of mud on dry wall. 5/27/13
Wall texture - done. Windows and doorways trimmed out - done. Baseboard - done. Ceiling beams - done. Two walls primed - 4 walls to go. Painting next. 6/7/13
Walls painted, trim and beams painted with 2 coats and clear coat, ceiling fans mounted and lights are up. Getting closer to getting the aquariums set up in this room! 6/11/13
Hedge Limbs carefully moved from shop  with tractor - thru doorways - and into Pond Shop of new building.
Calculations were right on - THEY FIT!!! (Around lights and ceiling fans and all other challenges.)
New aquarium stands brought in and placed in room.  Almost ready for fish. 6/24/13
Aquariums set up -  filled with water, air stones and filters going. Just about ready for fish, just have to let the water warm up, comes out of the well 48 - 50 degrees. 7/12/13
Set up pond product in Gallery Area, for now. 7/12/13
Pond Shop  - Aquariums filled with water, plants and fish - compressor fixed.  Salem the cat doing her daily patrolling of the pond shop. 7/25/13
Chuck completed the hedge benches with glass flower inlays for customer comfort while shopping for fish.  8/10/13
All new product on shelves. Pond Shop almost completed, on to Studio! Awesome!  9/3/13
Cure & seal applied to the studio floor. All floors have now been sealed in the building!  9/14/13
Tar paper on the outside of the main building ready for our next creativity adventure. 9/14/13
One year Anniversary of tearing down the barn - look how far we have come!
How the end of the building lookin at 9:00 am 10/12/13.
Planted Blue Junipers, Golden White Pine, Golden Spruce on West side of white building.  Added Golden Japanese Pine on left and White Willow on right out in grass area. 10/12/13
South side of building - 9:00 am. 10/12/13
Completed by 6:00 pm on 10/12/13.  Planted Snake Branch Spruce on Southwest corner.  Mulched area and added boulder retaining wall along the concrete area on west side of bed. Added Black feather rock sculptured rock as well as lg glass flowers.
Customer Consultation Area aka: Hens Nest. 1/15/14
Floral Design Area in loft. 1/15/14
Ceiling insulated! 1/15/14. Getting ready for drywall.
1/9/14 Winter Wonder Land at Starlight Art Glass Studio.
Completed putting up drywall for ceiling in Studio area of building. Feb 24, 14
We have gotten side tracked - removing trees, shrubs and ponds from the front yard. Before starting this we have completed the wiring in the new building - ready to insulate and drywall. Taking a break from the building to do some landscaping. 5/14/14
Front yard finished - leveled, seeded and rolled. Waiting for the grass to grow. 5/26/14
Added Bubble Arbor to entry of the building. 6/8/14
Studio walls ready for drywall. 6/19/14
Second coat of mud added to dry wall - ready for texture. 7/29/14
 2000 sq feet of walls and ceiling textured ready to paint in the studio area. 8/5/14
Studio Area: 11 - 4.5 gallons of plaster for hand texture on walls and ceiling, approximately 2000 sq feet. Primed (5 gallons), painted (5 gallons) Baby Smile Yellow with 4 gallons of Ultra White for ceiling. Heat shields installed on the walls for the kiln area. 8/14/14
Kiln area almost completed, glazed wall. 8 lights on ceiling in the studio. 8/20/14
Ready for scratch coat.10/8/14
Scratch coat applied 10/11/14. Brown coat applied 10/22/14.
Stucco applied ! ! ! 10/25/14
Kiln area in studio. 12/22/14
Last piece of insulation installed! 1/10/15
Digging trenches for gas and electrical along vat to east end of greenhouse.3/15/15
Digging trench for gas line around north side of building.  Notice arch in line - had to get out of frost in soil area!  3/15/15
Septic system getting in the ground, 3/27/15.
Finished painting the outside of the building. 3/31/15
Metal sheets added to the entry way. April 2015
January 3, 2016 ready to dry wall the gallery, bathroom and back hallway.
Dry wall up in back hallway, bathroom and gallery. 1/14/16
Finally - all dry wall up, textured and primed! 8 - 5 gallon buckets of mud and 5 gallons of primer.  Back hallway painted - done - ready to finish electrical and set up sink! 2/15/16
2/26/16  Ceiling drywall up! Ready for taping and texturing.
Ceiling in gallery primed and navy/majestic purple painted base coat. 4/1/16
Abstract galaxy and stars painting finished on gallery ceiling. 4/3/16
June 30, 2016. Wood from corn crib we tore down during the winter, washed and ready for white washing to finish the upper walls in gallery.
Mural painted in bathroom. 9-5-15
White washed Fir board on upper east and west wall in Gallery.9-15-15
Danish Oil on Fir board north wall in loft. 9-19-16
Dbl "S" beams up with S's applied. Finished installing all the multi thickness and lengths of Lawrence White Cedar boards - 9 sections varying from 5'- 8' long x 15" wide. Danish oil finish. 1/29/17
All the White Wash Barn Boards up in stairway walls. 2/2/17